Tuesday, December 27, 2011

Gingerbread People


I was really excited to make gingerbread people again this year. I ripped the recipe out of a Food Network Magazine last year, and I made sure that I kept it so I could use it again. It even made it through several attempts by Camden to eat through all of my cookbooks on the bottom shelf of the bookcase. What made this year's cookies even better was that I also made my own icing, which turned out perfect! Aren't they adorably sweet and  chubby?


After mixing all of the ingredients and rolling out the (really sticky) dough, I had to chill it in the refrigerator for 2 hours. Then, after cutting out my people, I had to refrigerate for 15 more minutes before transferring them to the cookie sheet and then the oven. If the dough isn'tcompletely cold, it sticks and stretches and the people turn out having elongated heads, or oddly shaped limbs.


Last year I borrowed my mother in law's gingerbread man cookie cutter. While Christmas shopping this year, I purchased a little man and a little lady. The cookies were a lot thicker and chewier this year, not as dog-biscuit-hard as usual gingerbread cookies. I attribute that to my crappy rolling pin, which stuck so much (even when floured) that I eventually stopped trying to roll the dough thinner.


To pipe the icing I used I trick that I saw somewhere recently. I think it was Pinterest.  You take your piping bag and put it in a glass. I used a tall beer glass because I wanted to put a lot of icing in at once. Then, you fold the extra plastic at the top over the edges of the glass. With a spoon or a cup, plop your icing right down into it.


 This was my first batch, which were my testers. Testers taste especially great with a glass of cold milk, by the way. The first few did not turn out so great. I always have to get myself adjusted to the piping bag and the consistency of the icing. This was homemade royal icing, so I didn't know how well it was going to work. Luckily, I got used to it pretty quickly and it worked just fine. It dries really fast too, so I didn't need to have cookies all around the house cooling. I could stack them pretty soon after I made them.


Do you like the girls' aprons? I thought they looked really cute. I tried giving the ladies faces, but they just looked like boys with skirts. I tried giving them hair, but that was a disaster. So faceless women in aprons they were. No social message intended. 


I brought the cookies over to all three Christmas events, Christmas Eve dinner with Mom, Christmas morning with the in-laws, and Christmas dinner with Dad. I still have a handful left at home and some leftover dough and icing in the refrigerator.

Last year, with just a few cookies left, Greg decided he would try to decorate a few himself. When I came back into the room, he'd started to make these gingerbread ghettobread men. This year, I asked him, again, to create an alternate lifestyle cookie. He picked the workaholicbread man. Ok, not as funny as last year's...but the decorating was hilariously awful (on both our parts). Can you guess which one of us decorated which ones?
2010 Ghetto Boys
2011 Workaholics

Recipe adapted from Food Network Magazine December (I think) 2010 Issue

Mix in a medium bowl:

31/2 cups of flour (sifted)
1 teaspoon each of baking soda and salt
1tablespoon of ground ginger
2 teaspoons cinnamon
1/4 teaspoon each ground cloves and allspice

Mix in a larger bowl:

6 tablespoons of melted butter
1 tablespoon of melted shortening
2/3 cup light brown sugar
3/4 cup of molasses
1 egg beaten in with mixer


Beat the flour mixture into the molasses mixture in two additions. Divide the dough in half, wrap in plastic, and pat to 1/2 inch thick. Chill for two hours. When the dough is done chilling, preheat the oven to 350. On a floured surface, roll each piece of dough to 1/4 inch thick. (Mine were slightly thicker). Cut with your cookie cutter and arrange 1 inch apart on parchment paper-lined baking sheets. (I used a silicone baking mat like this, which worked great.) Chill for 15 minutes. (I did this before transferring my cookies to the sheet, so they didn't stretch in transport). Bake until the cookies are golden around the edges. 10-12 minutes. (In my oven it was 10 minutes, even for the thicker cookies, because I didn't want them to get too hard.) Transfer them (after a few minutes) to a rack to cool. Then decorate.

The Icing: From here
3 egg whites
4 cups of powdered sugar

In a small to medium bowl, whisk 3 egg whites until they get frothy. Then, while mixing, add 4 cups of powdered sugar. Keep mixing until the icing is smooth. Use the method I explained earlier to add the icing to a piping bag, snip off the tip of the bag so you have a thin stream of icing, and then decorate!

Thanks for reading my thoughts about food! Happy Holidays!


Monday, December 19, 2011

Brussel Sprout Bandwagon

During Thanksgiving, I noticed that a certain vegetable had recipes "sprouting" up everywhere, like here and here. Being the trend follower that I am (Actually, I'm not at all... I just bought a pair of leggings recently, which came into style, what, 2 years ago? )

Well, I decided to try the brussel sprouts anyway. I have had them maybe once before in my life and it was so long ago that I don't even remember what I thought about them. When checking out recipes on food blogs, and magazines, they looked bright green, crispy, and pretty darn good, so I decided to give them a shot. Greg was not so adventurous at first, so I did what any good wife would do; I bought them and made them for dinner so when he got home from work they were waiting on his plate. Wisely, he did not complain.


To make this dish, I started by preheating my oven to 425 and taking my fresh sprouts out of the fridge.


Then I cut them in half and blanched them. To do that, get a pot of water boiling, throw in the sliced sprouts, and fish them out after about 45 seconds. They won't be very tender, but don't worry, you'll be cooking them in the oven as well.


Then, I drizzled olive oil over them (about a tablespoon) and added some salt, pepper, chunks of yellow onion and a teaspoon of minced garlic.


I spread them out on a cookie sheet and sprinkled them with white wine vinegar. Then, I baked them for 12 minutes. (I thought that Bobby Flay's recipe in the link above, which has an addition of quartered potato, looked awesome as did the one with pancetta. Anything to disguise the fact that we're eating a vegetable, right?)


Here is the end result. I especially like that the white wine vinegar cut into the very slight bitterness of the sprouts. I used about a half a tablespoon. I'm actually really happy with how these turned out. They seemed really versatile. I think cooking them with shallots or mushrooms and Parmesan would taste really good as well. So, jump on...the bandwagon is a yummy place to be!


 Thanks for reading my thoughts about food!


Friday, November 25, 2011

Holiday Cheer

Last year I had grand ideas of decorating for the holidays by cooking figgy pudding and boning ducks. This year, while still in the holiday spirit, I have been a bit more realistic, and unlike my usual procrastinating self, I've also started early. Here's a glimpse into a few of the holiday crafts I've been attempting around the house.


I made my first holiday wreath from stuff in my yard. I started with a $4 twiggy wreath from Michaels.


I cut some bay grasses from my yard that needed to be trimmed down before winter anyways.


 I added the grasses by tucking them in while going in one circular direction. A lot of the grass stuck out pretty far, but I liked it that way.


 Then, with my flashlight (it was late) and scissors in tow, I cut some sprigs off of my holly bush out front. The one downside to taking your materials from outside, and not buying them, is that you have to deal with all of the spider webs and creepy crawlies that get tangled up in your flora.


 Again, I just shoved the little holly springs into the wreath, in one main circular direction. I quickly learned that if I only decorated the "face" of the wreath, then the top, and inside would look really bare when I lifted it up, so I had to go back and do some adjusting. I also found some baby pine cones from the pine tree out front and jammed those in as well.


I wanted it to look really earthy, so I loosely stuck some grass on top of the holly.


Here are a few shots after I hung it on the front door.


 I've been "etching" to try this project since I saw this post last year. First, I printed out the words "holiday cheer" in 72 pt font, scotch taped the words to painters tape, which was on a wooden cutting board. I cut out the letters with an exacto knife. As you can see, the letters aren't perfect, but I sort of liked the imperfections.


 This was the scary part. The etching cream has all kinds of warnings on it. It even uses the word "fatal!" I mean, it dissolves glass, what could it do to my insides?! I was worried I would accidentally get some on my hand and then wipe my eye, and that I would get a globular shape etched into my eyeball


 I watched it from the inside to make sure it wasn't bleeding. You only need to leave it on for 60 seconds, so I was kind of anxious about making sure that I didn't over-etch.


 After washing it thoroughly and pealing off the tape, here's the result.


 Then, I cut out the word holiday and repeated the process.


.


For this last project, I simply grabbed a square glass vase and picked pine cones from my front yard. There were lots of baby cones when I went out, and only a few that had the typical pine cone shape. They also came pre-sapped. No white spray paint needed.


I put up my tree, but one of the lights is broken, so the top of the tree isn't lit. I'm waiting until I can replace the bulb to hang the ornaments. I already broke out the Christmas music, however, and my cheese factor is getting dangerously high. You might say I'm pretty "sappy" over Christmas this year. (haha, get it?) I might have even been singing "fa la la la la to the dogs last night..."

Just throwing on some chili tonight while I grade leftover papers that I should have done over Thanksgiving. I hope you're having a great start to the Holiday season!


Wednesday, November 23, 2011

Gobble Gobble

Happy Thanksgiving! Here are just a few of the things that I am thankful for this year. I also included a little pre-Thanksgiving recipe. I hope you have a terrific holiday!


5. Music. Yes, even us top-40 radio-listeners can appreciate music. So thank you to all of the girls and boys with guitars and pianos who make me sing squeak along like I'm on American Idol. (I like Adele when I'm feeling contemplative.)


4. My job. Teaching has got to be one of the best professions in the world. I got really frustrated this year because it seems like the media just can't get enough of bashing teaching and American education. But policies and politicians don't make up education, teachers and kids do. I am so lucky that my classes are full of kids who are thoughtful, intelligent, curious, and creative. Teaching is the most fun job out there. Where else do you have a group of 30 people all together in a room with the sole purpose of learning, discovering, and exploring?  We can joke, we can laugh at ourselves, we can connect music and film to literature, we can talk about our favorite books, we can debate and give our opinions, learn our strengths and work on our weaknesses. I mean, last week a student gave a persuasive speech about the Zombie Apocalypse. He brought in props, threw his papers on the ground, and banged his fist on the podium in a passionate fit! Afterwards, the students broke into spontaneous applause. It was incredible!


 3. The precious pups. Even though they eat my books, pee on the throw rugs, and bark all night, all of those things are worth it for the endless love they give. They are so hilariously entertaining and cuddly.


 2. My family. Especially my sister for getting home from college in one piece! She rented a car and drove herself 10 hours through the middle of the night and the rain to get home for Thanksgiving. Sarah, you rock! And I'm glad you are finally home.


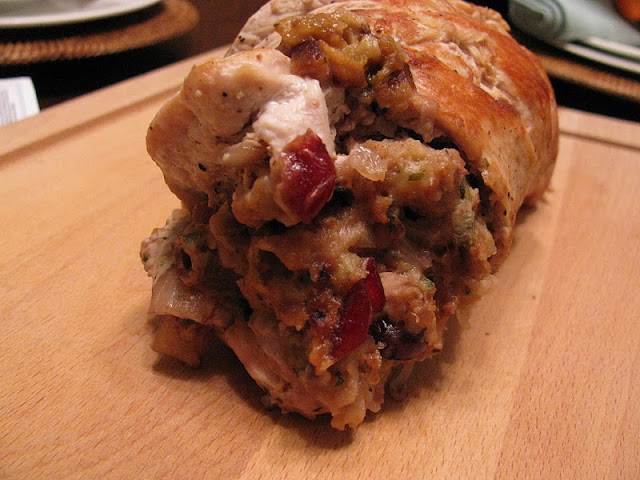
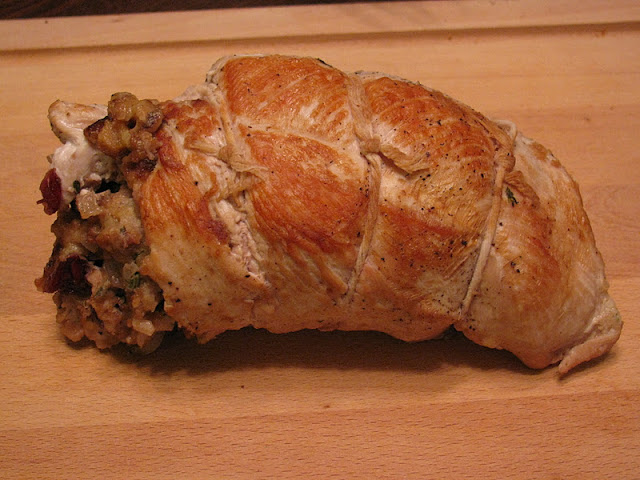
1. No Thanksgiving list is complete without being thankful for the impending feast! I'm thankful that I finally got around to making this Turkey Roulade after not getting up the motivation to do it  last year. It was fun and not even too difficult (although I did cheat a bit.) Here is the end result. If you want to see the steps on how I put it together, I've included ten-thousand pictures and a bit of instruction below.


Here's the whole process from the beginning, if you're interested!


 Greg and I bought this almost-two-pound Turkey breast at the grocery store on Saturday.


Scarily, it still had bones in it. I had not idea what to do, so I just felt around for where I could feel all of the bones connecting, wielded my knife and cut.


I made have cut a tiny bit more than needed on the end, but I still had plenty of meat left, so I figured I could make it work. 

I then had to "butterfly" the breast myself, which I didn't really do too prettily, but after I flattened the breast with a crab mallet, I doubt you would have been able to see that handiwork anyway.


Then I chopped some walnuts (about a 1/4 cup) and toasted them in my toaster oven.


 I sauteed 1/4 of a medium diced onion, garlic, and eventually the walnuts and craisins in 1 tablespoon of hot Canola oil. The recipe I was using called for making my own stuffing, but I just made a 3 minute box of Stovetop (I've got to save myself something to do next year!) 2 cups of the cooked stuffing also went into the pan. I also poured about 1/3 of a cup of chicken broth to the steaming pan so the stuffing didn't stick to the bottom and to moisten the mixture. You don't want it too moist because the Turkey lets out moisture while it's cooking.


 Then I spread the stuffing mixture onto the tukey that I salted and peppered on both sides. Then I rolled that sucker up nice and tight. Thanks to Greg for getting the kitchen twine at the very last second! He was pulling into the driveway with it as I was rolling!


Then I browned the Turkey on all sides in my dutch oven in about  tablespoon of canola oil.


 Then I added 1/2  cup of chicken broth and put the lid on tightly.I cooked it for about 30 minutes on medium because my turkey was not even two pounds before I removed the skin and bones.  For a breast of 2 1/2 pounds, the recipe recommended 60-65 minutes.


The recipe told me to "tent" the turkey while I made the gravy. I figured this is what it meant. For the gravy I added 1 cup of apple cider, another 1/2 cup of chicken broth, and 3 tablespoons of apple cider vinegar. It also said to add 1 tsp of dried sage, but I didn't have any. Then I let it boil for 10 minutes to reduce by a third. Then I added  slurry which was 1 tablespoon of cold water mixed with 1 teaspoon of cornstarch. This thickens the gravy just enough. It is not supposed to be too thick though.


I was in a lot of anticipation when Greg cut her open. Would it be done? Would it be overdone? Would it have the circular effect that I was going for?


Just perfect! Woo Hoo!


This by no means would have fed a whole family but it was perfect for us, with some leftovers to spare.

Thanks for reading and I hope you have a great Thanksgiving!